 Many of us have dogs or cats as part of our family, and as such we let them inside the house on the hardwood floors. Dogs and cats will walk, run and play on the wood floors and much like us humans will cause some damages over the years. Normal use of our wood floors will eventually cause loss of sheen, scratches, dents, stains and discoloration. Having pets in the house often causes early wear and tear and/or excessive scratches. This leads me to guide you through choosing and using your new wood floors.
The first thing you need to remember is that what you are wearing through is the finish on top of the wood floors, not the wood itself. When considering a new hardwood floors, remember that you don’t need the hardest wood in the world. Unless you drop hammers on the floor every day you don’t really need a floor like let’s say Ipe’ or Strand Woven Bamboo.
The second thing to remember is what the plan for the near future is; Are you going to sell the home? Are you staying there for a while and might need to be able to refinish the floors?
The third and last thing to ask yourself is what kind of pet do you have? Is it a small dog or a big heavy dog that will scratch the floor finish easily? Is it a puppy which urinates everywhere and will stain the wood?
Let’s discuss these issues and figure out which wood is best for you:
- If choosing a prefinished product buy a higher quality floor, usually the more you pay the better the finish. If you choose a site finished product make sure your contractor uses commercial finishes and not DIY cheap one component finishes. I recommend using a site finished product because of many reasons, the main one being – you can add one or two extra coats for more protection. That was easy, right?
- If you are selling the home in less than ten years then you’ll need to make sure your hardwood floor can be refinished or recoated before you sell it. Nobody wants to buy a home with a beat up wood floor that needs work or cannot be serviced. If you bought a prefinished floor that cannot be sanded because of a thin veneer or because of a Teflon like coating then you have a problem. If you chose a solid site finished product then you can easily repair and sand it, and most likely change the color/sheen.
- Important: no finish is impermeable – meaning if your dog urinates on the floor or a water spill stays on the floor it will eventually penetrate through the finish and stain the wood. The stain cannot be sanded off. The solution to this is preventing by training your pets, there is really nothing you can do with wood floors to protect them from liquid damage.
To summarize, choose a floor that is versatile in service and use. Don’t choose something too soft like Fir and you don’t have to use an exotic wood like Ipe’. There are many options for you out there like White Oak, Red Oak, Maple, Brazilian Cherry, European Oak and more. Do your research and make sure that in the end, you hire and consult a professional. In the next part I will discuss how to use and maintain your hardwood floors with pets in the home.
Oak Refinish in Richmond, CA
in Avis Floors, Custom Floors, Dustless Hardwood Floors/by Avi HadadMany homes in Richmond, CA have hardwood floors that were covered with carpets, laminate floor or painted over. As the Bay Area gets more crowded and the demand for land rises, home owners now shop for properties in areas less desirable in the past; areas like Oakland and Richmond. Many homes were neglected over the years and aside large expenses to remodel or add to their home, consumers understand the value in restoring their wood floors. The impact of refinishing your wood floors is immediate, beautiful and not as expensive as other remodel costs. Refinishing your wood floors should be done before you move into your new home.
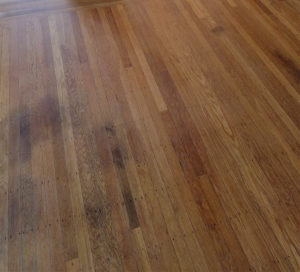
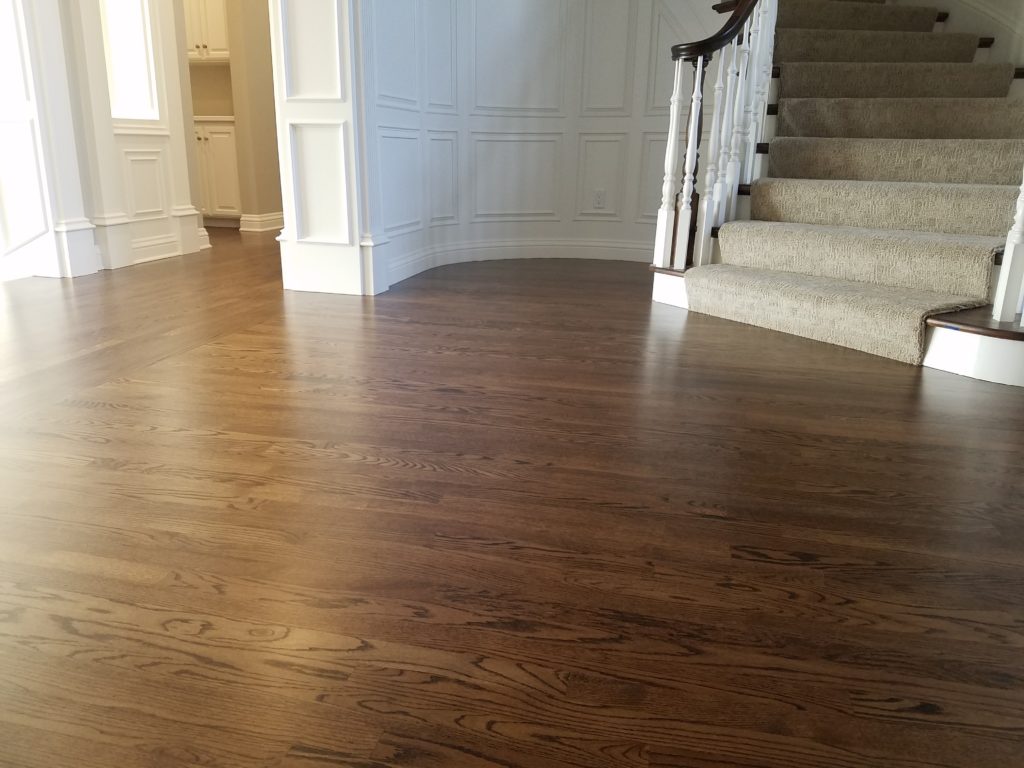
At Avi’s Hardwood Floors we use our experience, education and the latest technology in dust contained floor sanders to assure a job well done. In this featured project we were called to refinish an odd floor. The floor was sanded before but had obvious sanding marks and gauges in it. It also had several dark stains from water damage and pets urine.
We collected woods from different sources to match the existing for repairs, sanded the floor flat and applied three coats of commercial water base urethane.
The home owner was very happy with the price, the quality and the time it took us to complete the work.
Step 1 - Oak Refinish Richmond Before
Step 2 - Oak Refinish Richmond Before
Step 3 - Oak Refinish Richmond Before
Step 4 - Oak Refinish Richmond After
Step 5 - Oak Refinish Richmond After
Can You Put Hardwood Floors in The Bathroom?
in Avis Floors, Hardwood Floor Finishes, Installation, Maintaining Your Floors, New Harwood Floors/by Avi HadadWe all love wood floors. Wood is warmer and better than other flooring options. We can find wood floors in almost every home, from entryways to living rooms to every bedroom and closet. We often get questions like: “can we put hardwood floors in the bathroom”? Yes of course, but it is not that black and white. We don’t recommend solid wood floors in bathrooms with full showers or bathtubs, just because wood and water don’t mix. Wood will react to extreme changes in relative humidity and that is exactly what a steamy shower does. Despite my last statement, we did install solid wood floors in the past in full bathrooms with showers.
A successful wood floor install depends on how well balanced you keep the temperature and humidity conditions inside the bathroom. If the ventilation is poor and there is standing water over the floor every day, eventually the wood floor will discolor or cup.
If you have small children like I do, you know better than to let them have a bath with wood floors just inches away. Families with small children should probably consider something other than wood for a bathroom floors, well at least until the kids grow a little older.
If you keep the bathroom well ventilated and place a mat over the floor, the wood will last longer.
Using white or red oak floors, preferably vertical grain for stability reasons is the way to go.
Design your bathroom with wood floors in mind and enjoy the warmth and beauty of it for years to come.
Top Five Complaints and how to Avoid Them
in Avis Floors, Hardwood Floor Finishes, How To, Installation, Maintaining Your Floors, New Harwood Floors, Refinishing Floors, Tips, Wood Floors/by Avi HadadThe most common complaints are:
At Avi’s Hardwood Floors we work hard to make sure every client is truly happy for years to come. This takes a lot of educating you the client and open lines of communication throughout your project. As it is impossible to make each floor perfect, we get pretty darn close to it every time.
Hiring a Professional to Sand and Finish Your Hardwood Floors – Understand What You Pay For
in Avis Floors, Custom Floors, Design Styles, Hardwood Floor Finishes, Installation, New Harwood Floors, Refinishing Floors, Wood Floors/by Avi HadadThese days it seems most flooring products in the market are part of a trend of colors like gray and white. These floors are mostly engineered and often wire brushed which means – you cannot refinish them in the future. The art of sanding and finishing is slowly disappearing as the need for craftsmanship is declining. The market is filled with more people who can only install floors at a simple straight layout, yet alone add borders or set inlays and medallions.
The art of sanding and finishing is more appreciated now than ever, as home owners who have solid wood floors start searching for someone to refinish their wood floors, they often times find it hard to find someone qualified to do the job. Most guys have not had any training in refinishing floors or simply cannot do it.
As you can see, sanding and finishing wood floors is truly an art. It cannot simply be taught by attending one school, watching a video or reading a book alone. It is a process of years of learning and with each wood floor comes a new challenge. Next time you look for someone to refinish your wood floor understand that not all who say they can – can do it well.
How We Contain Wood Dust
in Avis Floors, Custom Floors, Design Styles, Dustless Hardwood Floors, Hardwood Floor Finishes, How To, Installation, New Harwood Floors, Pre Finished Floors, Refinishing Floors, Tips, Wood Floors/by Avi HadadWe start with a clean site. Normally we would vacuum the floors and spend time taping off areas of the home where we don’t work. If we work in kitchen area we tape off all cabinets and if you have a big tv and wall mount speakers we will tape them off as well.
We use state of the art sanding machines – these machines are expensive industrial type sanders that are specifically designed for wood sanding. These sanders are the only ones in the world tested for wood dust emissions and are the most efficient in dust containment. Sounds like magic, right? Not really. We have seen other contractors claim to be dust free when in fact all they have is an old sander with a cheap utility vacuum attached to it. A vacuum sucks in the air and blows out air. If the vacuum is not designed to capture and contain the fine particles of dust then that dust will end up back in the air.
Some of our sanders have built in dust containment systems. All we have to do is empty the bags outside when they are full. Some of our other sanders are part of a dust free sanding system so all the vacuums are interchangeable and all the filters are HEPA filters. HEPA is the most efficient filter (and most expensive) in collecting fine dust.
Of course, there is always a few dust particles that get away and end up on the baseboards or in the corners. The last step of refinishing your floors is vacuuming every inch of the floors, window cells and other areas. We thoroughly check the site for any dust and wipe off any surfaces like counter tops.
The results yield a clean home with a newly refinished floor and a clean top coat of finish with no debris or dust stuck in it. At Avi’s Hardwood Floors we have done hundreds of jobs for families that had members of the family with allergies or other health conditions. We even did a few jobs for some with severe dust allergies. Those home owners had such strong reactions to dust they had specialty air cleaning systems installed in their home. Hiring us was the sure thing to do and we never disappointed anyone with our promise for a clean sanding job.
One client insisted we taped off their entire living room before we started work. We did. He came to check up on us a few hours into the refinishing process and said: “wow, there really isn’t any dust!” we just smiled and kept on sanding.
Trust us in doing a great job while keeping your home clean. This is not one of those empty marketing promises, it is the truth.
Why Should You Be Concerned about Wood Dust?
in Avis Floors, Custom Floors, Dustless Hardwood Floors, Exotic Woods, Hardwood Floor Finishes, How To, Installation, New Harwood Floors, Pre Finished Floors, Refinishing Floors, Tips/by Avi HadadHow do we create wood dust and why does it get everywhere?
in Avis Floors, Custom Floors, Design Styles, Dustless Hardwood Floors, Hardwood Floor Finishes, How To, Installation, New Harwood Floors, Pre Finished Floors, Refinishing Floors, Wood Floors/by Avi HadadWe use several kinds of sanding machines:
The one thing that is common to all these machines is this: they all create very fine dust quickly. Unless there is a vacuum there to contain the dust, it will get in the air immediately. The motor parts and fans inside the sanders help blow the dust off the floor and up into the air. Once in the air, the dust will travel several feet and often far enough into other rooms. It takes several hours for fine wood dust to settle on flat surfaces like shelves and floor coverings.
A big part of our business is fixing other people’s sanding jobs. We have seen dust on walls, in bedrooms all over the home owners stereo and tv. We have seen dust completely covering a furnace air return and piles of it inside floor heat registers. Dust must be contained for a good sanding job.
The Best Wood Floors for Dog and Cat Owners – Part 2
in Avis Floors, Custom Floors, Design Styles, Exotic Woods, Hardwood Floor Finishes, Maintaining Your Floors, New Harwood Floors, Tips, Wood Floors/by Avi HadadDogs and cats are probably the most common pets we all have in our home. Much like any member of our family they spill water, shed hair, scratch the wood floors and just plain wear through the house just living in it. That is part of everybody’s life. Added to the equation is the fact that if not properly trained, pets will urinate on the wood floors and permanently stain the wood.
If you have a dog or a cat and hardwood floors in your home, this blog is to help you understand what your pets do to your floors and how to keep the floors clean and maintained.
Common topics my clients have asked me about:
Much like us dogs and cats use and wear our wood floors. Following these simple guidelines will help reduce wear and tear on your floors and keep them clean for all to enjoy.
NWFA Announced Leadership Award, 2015 Board
in Avis Floors, Awards, Hardwood Federation, NWFA/by Avi HadadNWFA’s 2015 board. Seated, from left: Steve Brattin, SVB Wood Floor Service; Jon Namba, Namba Services; Julie Russell, Glitsa, a division of Rudd Co.; Jeff Fairbanks, Pal Duro Hardwoods; John Lessick, Apex Wood Floors; Brenda Cashion, Pinnacle Interior Elements and Michael Martin, NWFA’s president and CEO.
Middle row, from left: Lenny Hall, Endurance Floor Co.; Avi Hadad, Avi’s Hardwood Floors; Jon Smith, Smith Flooring; (2014 Board member) Joe Rocco, Artistic Floors by Design; Jim Gould, Floor Covering Institute; Craig Dupra, Installers Warehouse; Chris Zizza, C&R Flooring and Tommy Maxwell, Maxwell Hardwood Flooring.
Back row, from left: Dan Natkin, Mannington Wood Floors; Kevin Murphy, Trinity Hardwood Distributors and John Wooten, CMH Space Flooring Products.
Source
The Best Wood Floors for Dog and Cat Owners – Part 1
in Avis Floors, Custom Floors, Design Styles, Exotic Woods, Hardwood Floor Finishes, Maintaining Your Floors, New Harwood Floors, Refinishing Floors, Tips, Wood Floors/by Avi HadadThe first thing you need to remember is that what you are wearing through is the finish on top of the wood floors, not the wood itself. When considering a new hardwood floors, remember that you don’t need the hardest wood in the world. Unless you drop hammers on the floor every day you don’t really need a floor like let’s say Ipe’ or Strand Woven Bamboo.
The second thing to remember is what the plan for the near future is; Are you going to sell the home? Are you staying there for a while and might need to be able to refinish the floors?
The third and last thing to ask yourself is what kind of pet do you have? Is it a small dog or a big heavy dog that will scratch the floor finish easily? Is it a puppy which urinates everywhere and will stain the wood?
Let’s discuss these issues and figure out which wood is best for you:
To summarize, choose a floor that is versatile in service and use. Don’t choose something too soft like Fir and you don’t have to use an exotic wood like Ipe’. There are many options for you out there like White Oak, Red Oak, Maple, Brazilian Cherry, European Oak and more. Do your research and make sure that in the end, you hire and consult a professional. In the next part I will discuss how to use and maintain your hardwood floors with pets in the home.